Coleman Bayside Pop Up Tour
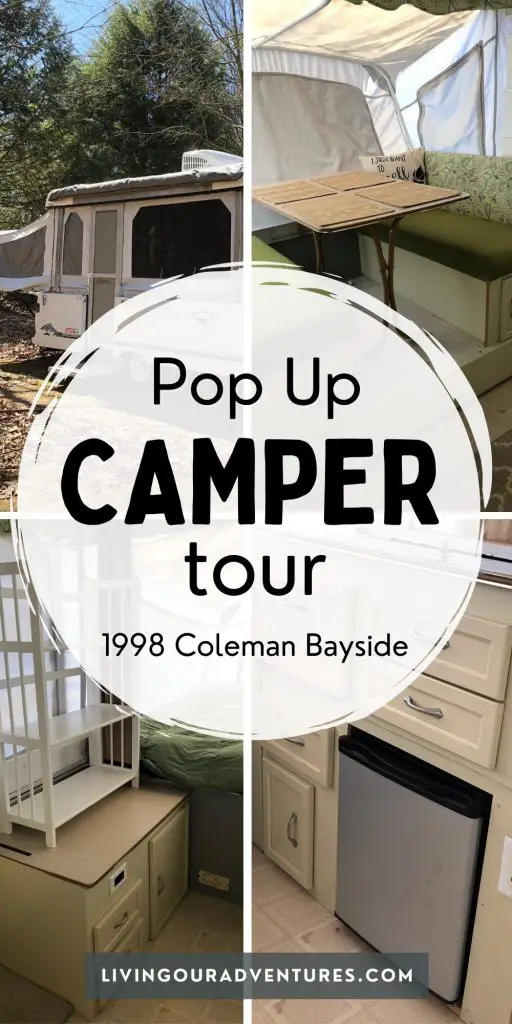
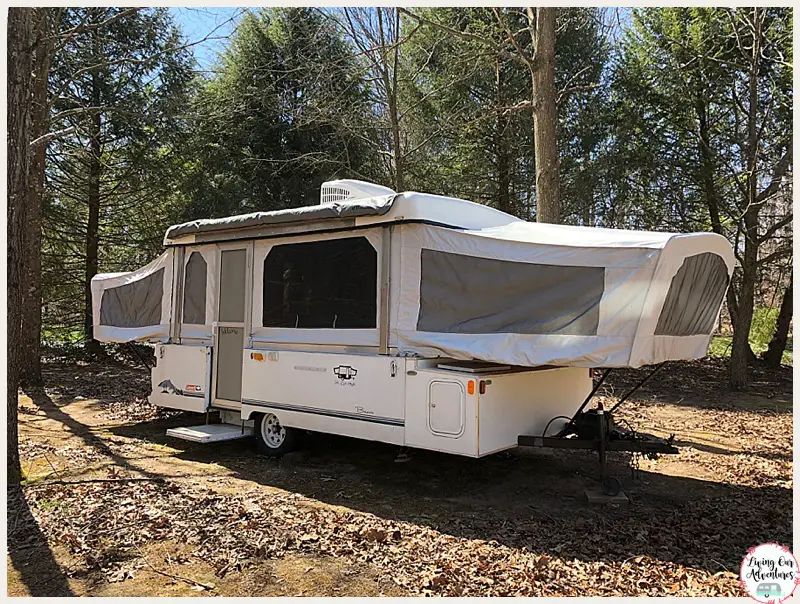
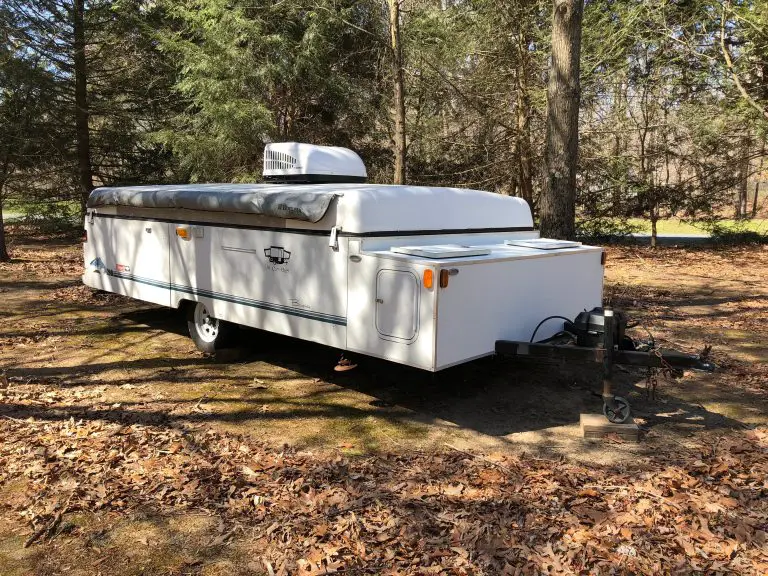
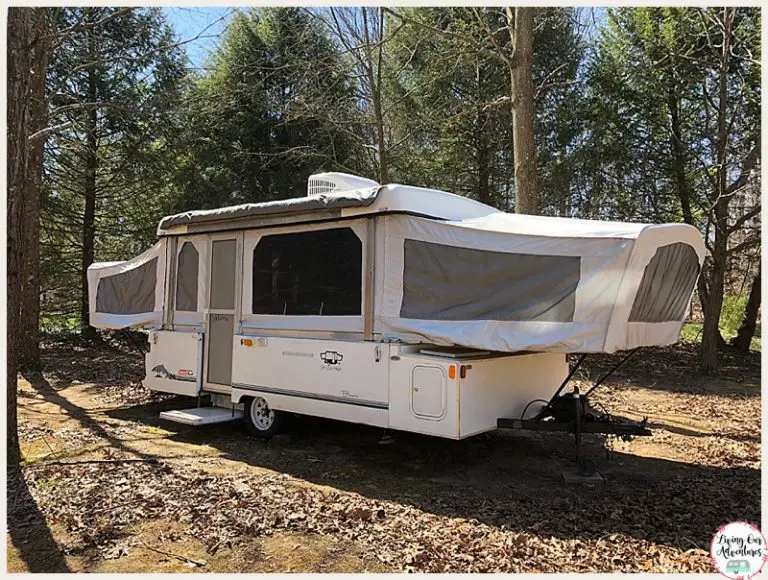
I don’t know about you but I love seeing what others have done to the inside of their campers. It always gives me ideas as to what we could change about our camper. Before starting our renovation I would check the pop-up princess blog about 3-4 times a week just waiting for her to showcase another pop up remodel. And if I love looking at everyone else’s camper remodels then I should probably post ours for you to see. So here is a picture tour of our 1998 Coleman Bayside Pop Up.
Disclosure: Some of the links below are affiliate links, meaning, at no additional cost to you, I will earn a commission if you click through and make a purchase.
Outside
Coleman Pop Up Roof
Being we have a Coleman the top needed to be fixed up a bit. This was a huge project and one that needed to be done first.
Read how we did it here, ABS Roof Repair.
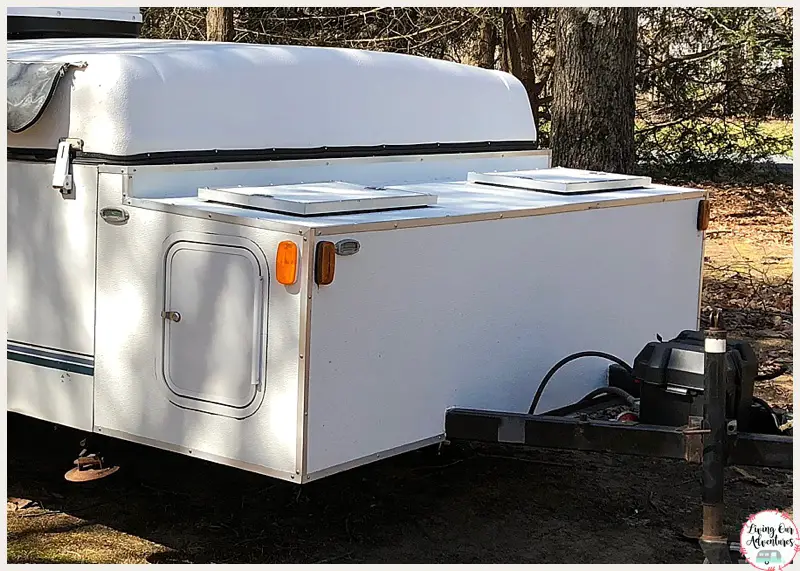
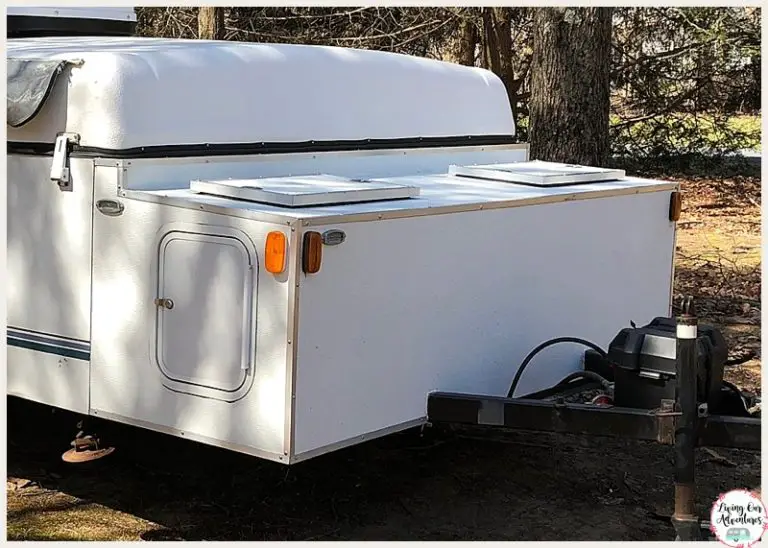
Coleman Storage Box Rebuild
On the outside, we completely demoed the front storage box and rebuilt it. This was a big project and you can read about in our Pop Up Camper Storage Box Rebuild post.
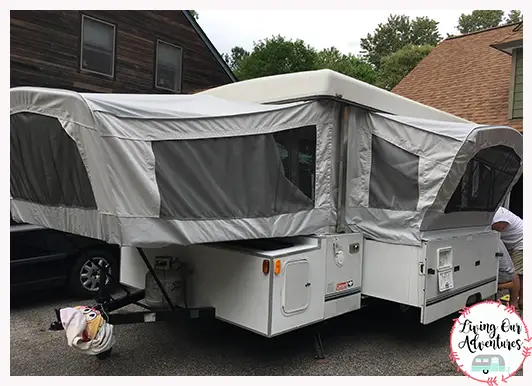
Coleman Canvas Replacement
The canvas had seen better days and the mice had gotten a hold of it so we replaced the canvas. Read more about how we did this, HERE.
And to make it feel like home I had to add a decal with the name we choose.
Inside
Kitchen Area
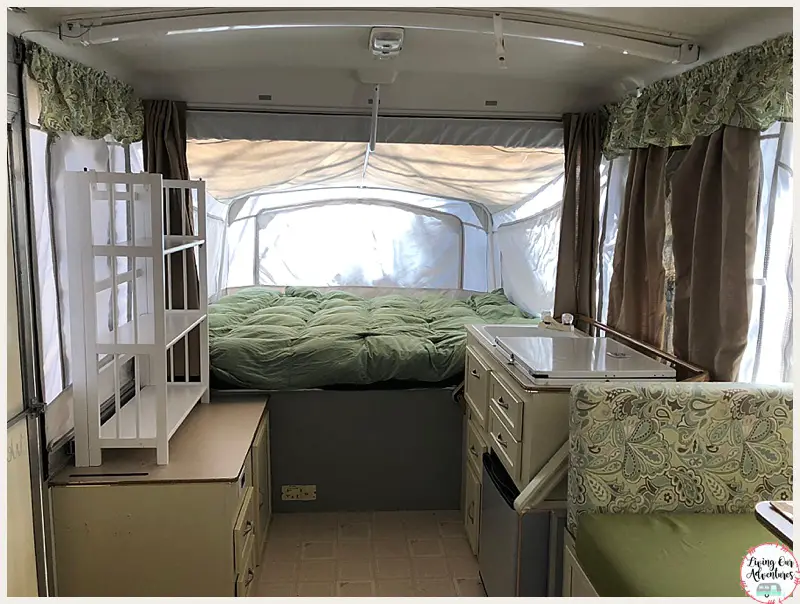
We painted all of the cabinets a cream color, replaced the icebox, took out the one shelf across from the stove/sink and replaced it with a 3 tier shelf that folds flat for travels. There is a big lower cabinet across from the sink/stove that is really tall and often felt like a waste of space so before putting the cabinet doors back on we added a shelf, which gave us a lot of extra storage.
Cushions
I covered all of the cushions with a beige, green and tan flower print. To ensure that it wasn’t too much floral I covered all of the seat cushions in solid green. All of the fabric was from Joann fabrics and it is a duck cloth material that would be easy to clean. I followed this simple tutorial from the Pop Up Princess when covering the cushions.
Curtains
Instead of buying fabric for the curtains and making them from scratch I bought pre-made curtains from Target. Then I hemmed them to length and used white cotton fabric to add a backing to make them blackout curtains. You can find that tutorial on Craftsy. Once that was all done and ironed I sewed on the valance clips. Jamie had thrown away all of the old curtains so I did have to buy new valance clips on Amazon.
Walls
There aren’t many “walls” per se in the camper because of the bench, the cabinets, and the table so we didn’t have too many walls to paint. For the two sections of wall space, we went with a gray because most often we would kick or hit that wall climbing up into bed.
Storage
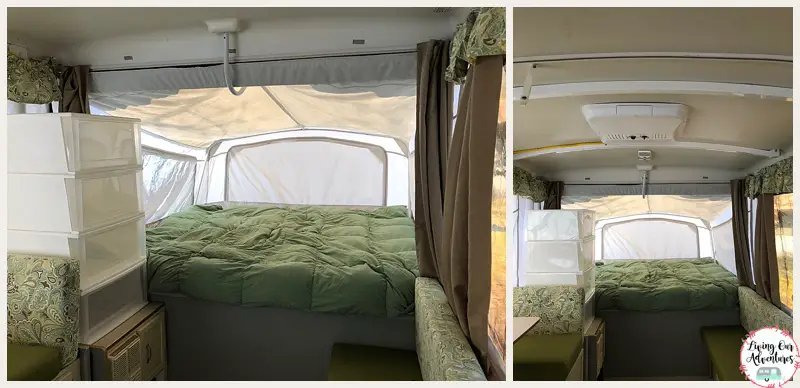
The clothing storage in the camper was lacking and very inconvenient. So we took it out and added these stacking pull drawers from Amazon. They aren’t cheap but it gives everyone more space for their clothes and makes it much easier to pack. For travel, we unstack them and line them up on the floor.
Rugs
are from Target. They cover the floor just enough so you don’t feel like you are walking on the sand all the time. I have also thrown them in the washer after rainy, muddy trips and they have held up really well.
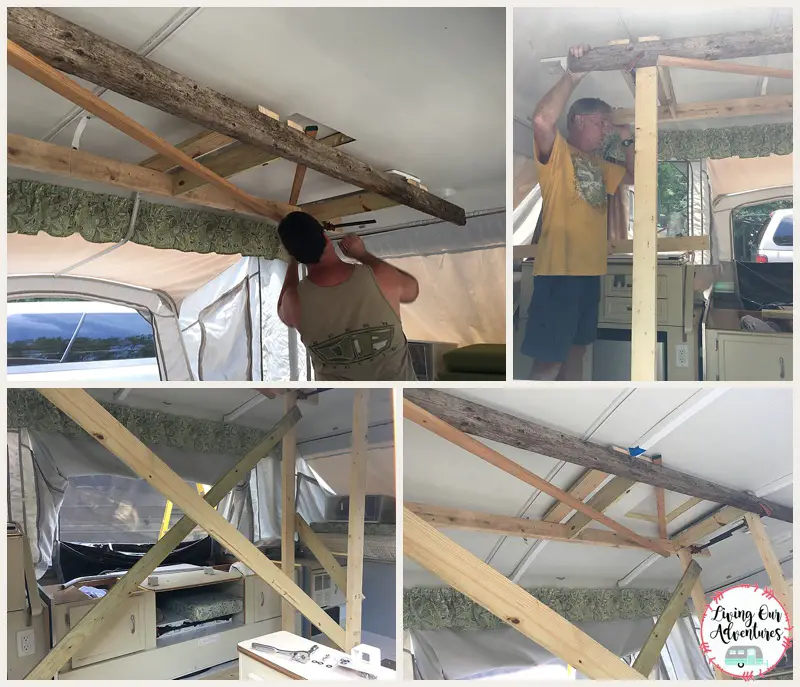
Coleman Pop Up Roof Support / AC Unit
The roof supports and ac unit were not as fun decor wise we did beef up the roof by adding roof support and then added an AC Unit to make summer camping more enjoyable.
If you are looking for other Camper Modifications please subscribe to our Newsletters and check out our Camper Mods page.
You May Enjoy These Related Articles
Did you enjoy this article? Want to hear more? Stay in touch! Sign up below to receive weekly tips and inspiration for your homestead.
.formkit-form[data-uid="047dcecf6b"] *{box-sizing:border-box;}.formkit-form[data-uid="047dcecf6b"]{-webkit-font-smoothing:antialiased;-moz-osx-font-smoothing:grayscale;}.formkit-form[data-uid="047dcecf6b"] legend{border:none;font-size:inherit;margin-bottom:10px;padding:0;position:relative;display:table;}.formkit-form[data-uid="047dcecf6b"] fieldset{border:0;padding:0.01em 0 0 0;margin:0;min-width:0;}.formkit-form[data-uid="047dcecf6b"] body:not(:-moz-handler-blocked) fieldset{display:table-cell;}.formkit-form[data-uid="047dcecf6b"] h1,.formkit-form[data-uid="047dcecf6b"] h2,.formkit-form[data-uid="047dcecf6b"] h3,.formkit-form[data-uid="047dcecf6b"] h4,.formkit-form[data-uid="047dcecf6b"] h5,.formkit-form[data-uid="047dcecf6b"] h6{color:inherit;font-size:inherit;font-weight:inherit;}.formkit-form[data-uid="047dcecf6b"] h2{font-size:1.5em;margin:1em 0;}.formkit-form[data-uid="047dcecf6b"] h3{font-size:1.17em;margin:1em 0;}.formkit-form[data-uid="047dcecf6b"] p{color:inherit;font-size:inherit;font-weight:inherit;}.formkit-form[data-uid="047dcecf6b"] ol:not([template-default]),.formkit-form[data-uid="047dcecf6b"] ul:not([template-default]),.formkit-form[data-uid="047dcecf6b"] blockquote:not([template-default]){text-align:left;}.formkit-form[data-uid="047dcecf6b"] p:not([template-default]),.formkit-form[data-uid="047dcecf6b"] hr:not([template-default]),.formkit-form[data-uid="047dcecf6b"] blockquote:not([template-default]),.formkit-form[data-uid="047dcecf6b"] ol:not([template-default]),.formkit-form[data-uid="047dcecf6b"] ul:not([template-default]){color:inherit;font-style:initial;}.formkit-form[data-uid="047dcecf6b"] .ordered-list,.formkit-form[data-uid="047dcecf6b"] .unordered-list{list-style-position:outside !important;padding-left:1em;}.formkit-form[data-uid="047dcecf6b"] .list-item{padding-left:0;}.formkit-form[data-uid="047dcecf6b"][data-format="modal"]{display:none;}.formkit-form[data-uid="047dcecf6b"][data-format="slide in"]{display:none;}.formkit-form[data-uid="047dcecf6b"][data-format="sticky bar"]{display:none;}.formkit-sticky-bar .formkit-form[data-uid="047dcecf6b"][data-format="sticky bar"]{display:block;}.formkit-form[data-uid="047dcecf6b"] .formkit-input,.formkit-form[data-uid="047dcecf6b"] .formkit-select,.formkit-form[data-uid="047dcecf6b"] .formkit-checkboxes{width:100%;}.formkit-form[data-uid="047dcecf6b"] .formkit-button,.formkit-form[data-uid="047dcecf6b"] .formkit-submit{border:0;border-radius:5px;color:#ffffff;cursor:pointer;display:inline-block;text-align:center;font-size:15px;font-weight:500;cursor:pointer;margin-bottom:15px;overflow:hidden;padding:0;position:relative;vertical-align:middle;}.formkit-form[data-uid="047dcecf6b"] .formkit-button:hover,.formkit-form[data-uid="047dcecf6b"] .formkit-submit:hover,.formkit-form[data-uid="047dcecf6b"] .formkit-button:focus,.formkit-form[data-uid="047dcecf6b"] .formkit-submit:focus{outline:none;}.formkit-form[data-uid="047dcecf6b"] .formkit-button:hover > span,.formkit-form[data-uid="047dcecf6b"] .formkit-submit:hover > span,.formkit-form[data-uid="047dcecf6b"] .formkit-button:focus > span,.formkit-form[data-uid="047dcecf6b"] .formkit-submit:focus > span{background-color:rgba(0,0,0,0.1);}.formkit-form[data-uid="047dcecf6b"] .formkit-button > span,.formkit-form[data-uid="047dcecf6b"] .formkit-submit > span{display:block;-webkit-transition:all 300ms ease-in-out;transition:all 300ms ease-in-out;padding:12px 24px;}.formkit-form[data-uid="047dcecf6b"] .formkit-input{background:#ffffff;font-size:15px;padding:12px;border:1px solid #e3e3e3;-webkit-flex:1 0 auto;-ms-flex:1 0 auto;flex:1 0 auto;line-height:1.4;margin:0;-webkit-transition:border-color ease-out 300ms;transition:border-color ease-out 300ms;}.formkit-form[data-uid="047dcecf6b"] .formkit-input:focus{outline:none;border-color:#1677be;-webkit-transition:border-color ease 300ms;transition:border-color ease 300ms;}.formkit-form[data-uid="047dcecf6b"] .formkit-input::-webkit-input-placeholder{color:inherit;opacity:0.8;}.formkit-form[data-uid="047dcecf6b"] .formkit-input::-moz-placeholder{color:inherit;opacity:0.8;}.formkit-form[data-uid="047dcecf6b"] .formkit-input:-ms-input-placeholder{color:inherit;opacity:0.8;}.formkit-form[data-uid="047dcecf6b"] .formkit-input::placeholder{color:inherit;opacity:0.8;}.formkit-form[data-uid="047dcecf6b"] [data-group="dropdown"]{position:relative;display:inline-block;width:100%;}.formkit-form[data-uid="047dcecf6b"] [data-group="dropdown"]::before{content:"";top:calc(50% - 2.5px);right:10px;position:absolute;pointer-events:none;border-color:#4f4f4f transparent transparent transparent;border-style:solid;border-width:6px 6px 0 6px;height:0;width:0;z-index:999;}.formkit-form[data-uid="047dcecf6b"] [data-group="dropdown"] select{height:auto;width:100%;cursor:pointer;color:#333333;line-height:1.4;margin-bottom:0;padding:0 6px;-webkit-appearance:none;-moz-appearance:none;appearance:none;font-size:15px;padding:12px;padding-right:25px;border:1px solid #e3e3e3;background:#ffffff;}.formkit-form[data-uid="047dcecf6b"] [data-group="dropdown"] select:focus{outline:none;}.formkit-form[data-uid="047dcecf6b"] [data-group="checkboxes"]{text-align:left;margin:0;}.formkit-form[data-uid="047dcecf6b"] [data-group="checkboxes"] [data-group="checkbox"]{margin-bottom:10px;}.formkit-form[data-uid="047dcecf6b"] [data-group="checkboxes"] [data-group="checkbox"] *{cursor:pointer;}.formkit-form[data-uid="047dcecf6b"] [data-group="checkboxes"] [data-group="checkbox"]:last-of-type{margin-bottom:0;}.formkit-form[data-uid="047dcecf6b"] [data-group="checkboxes"] [data-group="checkbox"] input[type="checkbox"]{display:none;}.formkit-form[data-uid="047dcecf6b"] [data-group="checkboxes"] [data-group="checkbox"] input[type="checkbox"] + label::after{content:none;}.formkit-form[data-uid="047dcecf6b"] [data-group="checkboxes"] [data-group="checkbox"] input[type="checkbox"]:checked + label::after{border-color:#ffffff;content:"";}.formkit-form[data-uid="047dcecf6b"] [data-group="checkboxes"] [data-group="checkbox"] input[type="checkbox"]:checked + label::before{background:#10bf7a;border-color:#10bf7a;}.formkit-form[data-uid="047dcecf6b"] [data-group="checkboxes"] [data-group="checkbox"] label{position:relative;display:inline-block;padding-left:28px;}.formkit-form[data-uid="047dcecf6b"] [data-group="checkboxes"] [data-group="checkbox"] label::before,.formkit-form[data-uid="047dcecf6b"] [data-group="checkboxes"] [data-group="checkbox"] label::after{position:absolute;content:"";display:inline-block;}.formkit-form[data-uid="047dcecf6b"] [data-group="checkboxes"] [data-group="checkbox"] label::before{height:16px;width:16px;border:1px solid #e3e3e3;background:#ffffff;left:0px;top:3px;}.formkit-form[data-uid="047dcecf6b"] [data-group="checkboxes"] [data-group="checkbox"] label::after{height:4px;width:8px;border-left:2px solid #4d4d4d;border-bottom:2px solid #4d4d4d;-webkit-transform:rotate(-45deg);-ms-transform:rotate(-45deg);transform:rotate(-45deg);left:4px;top:8px;}.formkit-form[data-uid="047dcecf6b"] .formkit-alert{background:#f9fafb;border:1px solid #e3e3e3;border-radius:5px;-webkit-flex:1 0 auto;-ms-flex:1 0 auto;flex:1 0 auto;list-style:none;margin:25px auto;padding:12px;text-align:center;width:100%;}.formkit-form[data-uid="047dcecf6b"] .formkit-alert:empty{display:none;}.formkit-form[data-uid="047dcecf6b"] .formkit-alert-success{background:#d3fbeb;border-color:#10bf7a;color:#0c905c;}.formkit-form[data-uid="047dcecf6b"] .formkit-alert-error{background:#fde8e2;border-color:#f2643b;color:#ea4110;}.formkit-form[data-uid="047dcecf6b"] .formkit-spinner{display:-webkit-box;display:-webkit-flex;display:-ms-flexbox;display:flex;height:0px;width:0px;margin:0 auto;position:absolute;top:0;left:0;right:0;width:0px;overflow:hidden;text-align:center;-webkit-transition:all 300ms ease-in-out;transition:all 300ms ease-in-out;}.formkit-form[data-uid="047dcecf6b"] .formkit-spinner > div{margin:auto;width:12px;height:12px;background-color:#fff;opacity:0.3;border-radius:100%;display:inline-block;-webkit-animation:formkit-bouncedelay-formkit-form-data-uid-047dcecf6b- 1.4s infinite ease-in-out both;animation:formkit-bouncedelay-formkit-form-data-uid-047dcecf6b- 1.4s infinite ease-in-out both;}.formkit-form[data-uid="047dcecf6b"] .formkit-spinner > div:nth-child(1){-webkit-animation-delay:-0.32s;animation-delay:-0.32s;}.formkit-form[data-uid="047dcecf6b"] .formkit-spinner > div:nth-child(2){-webkit-animation-delay:-0.16s;animation-delay:-0.16s;}.formkit-form[data-uid="047dcecf6b"] .formkit-submit[data-active] .formkit-spinner{opacity:1;height:100%;width:50px;}.formkit-form[data-uid="047dcecf6b"] .formkit-submit[data-active] .formkit-spinner ~ span{opacity:0;}.formkit-form[data-uid="047dcecf6b"] .formkit-powered-by[data-active="false"]{opacity:0.35;}.formkit-form[data-uid="047dcecf6b"] .formkit-powered-by-convertkit-container{display:-webkit-box;display:-webkit-flex;display:-ms-flexbox;display:flex;width:100%;z-index:5;margin:10px 0;position:relative;}.formkit-form[data-uid="047dcecf6b"] .formkit-powered-by-convertkit-container[data-active="false"]{opacity:0.35;}.formkit-form[data-uid="047dcecf6b"] .formkit-powered-by-convertkit{-webkit-align-items:center;-webkit-box-align:center;-ms-flex-align:center;align-items:center;background-color:#ffffff;border:1px solid #dde2e7;border-radius:4px;color:#373f45;cursor:pointer;display:block;height:36px;margin:0 auto;opacity:0.95;padding:0;-webkit-text-decoration:none;text-decoration:none;text-indent:100%;-webkit-transition:ease-in-out all 200ms;transition:ease-in-out all 200ms;white-space:nowrap;overflow:hidden;-webkit-user-select:none;-moz-user-select:none;-ms-user-select:none;user-select:none;width:190px;background-repeat:no-repeat;background-position:center;background-image:url("data:image/svg+xml;charset=utf8,%3Csvg width='162' height='20' viewBox='0 0 162 20' fill='none' xmlns='http://www.w3.org/2000/svg'%3E%3Cpath d='M83.0561 15.2457C86.675 15.2457 89.4722 12.5154 89.4722 9.14749C89.4722 5.99211 86.8443 4.06563 85.1038 4.06563C82.6801 4.06563 80.7373 5.76407 80.4605 8.28551C80.4092 8.75244 80.0387 9.14403 79.5686 9.14069C78.7871 9.13509 77.6507 9.12841 76.9314 9.13092C76.6217 9.13199 76.3658 8.88106 76.381 8.57196C76.4895 6.38513 77.2218 4.3404 78.618 2.76974C80.1695 1.02445 82.4289 0 85.1038 0C89.5979 0 93.8406 4.07791 93.8406 9.14749C93.8406 14.7608 89.1832 19.3113 83.1517 19.3113C78.8502 19.3113 74.5179 16.5041 73.0053 12.5795C72.9999 12.565 72.9986 12.5492 73.0015 12.534C73.0218 12.4179 73.0617 12.3118 73.1011 12.2074C73.1583 12.0555 73.2143 11.907 73.2062 11.7359L73.18 11.1892C73.174 11.0569 73.2075 10.9258 73.2764 10.8127C73.3452 10.6995 73.4463 10.6094 73.5666 10.554L73.7852 10.4523C73.9077 10.3957 74.0148 10.3105 74.0976 10.204C74.1803 10.0974 74.2363 9.97252 74.2608 9.83983C74.3341 9.43894 74.6865 9.14749 75.0979 9.14749C75.7404 9.14749 76.299 9.57412 76.5088 10.1806C77.5188 13.1 79.1245 15.2457 83.0561 15.2457Z' fill='%23373F45'/%3E%3Cpath d='M155.758 6.91365C155.028 6.91365 154.804 6.47916 154.804 5.98857C154.804 5.46997 154.986 5.06348 155.758 5.06348C156.53 5.06348 156.712 5.46997 156.712 5.98857C156.712 6.47905 156.516 6.91365 155.758 6.91365ZM142.441 12.9304V9.32833L141.415 9.32323V8.90392C141.415 8.44719 141.786 8.07758 142.244 8.07986L142.441 8.08095V6.55306L144.082 6.09057V8.08073H145.569V8.50416C145.569 8.61242 145.548 8.71961 145.506 8.81961C145.465 8.91961 145.404 9.01047 145.328 9.08699C145.251 9.16351 145.16 9.2242 145.06 9.26559C144.96 9.30698 144.853 9.32826 144.745 9.32822H144.082V12.7201C144.082 13.2423 144.378 13.4256 144.76 13.4887C145.209 13.5629 145.583 13.888 145.583 14.343V14.9626C144.029 14.9626 142.441 14.8942 142.441 12.9304Z' fill='%23373F45'/%3E%3Cpath d='M110.058 7.92554C108.417 7.88344 106.396 8.92062 106.396 11.5137C106.396 14.0646 108.417 15.0738 110.058 15.0318C111.742 15.0738 113.748 14.0646 113.748 11.5137C113.748 8.92062 111.742 7.88344 110.058 7.92554ZM110.07 13.7586C108.878 13.7586 108.032 12.8905 108.032 11.461C108.032 10.1013 108.878 9.20569 110.071 9.20569C111.263 9.20569 112.101 10.0995 112.101 11.459C112.101 12.8887 111.263 13.7586 110.07 13.7586Z' fill='%23373F45'/%3E%3Cpath d='M118.06 7.94098C119.491 7.94098 120.978 8.33337 120.978 11.1366V14.893H120.063C119.608 14.893 119.238 14.524 119.238 14.0689V10.9965C119.238 9.66506 118.747 9.16047 117.891 9.16047C117.414 9.16047 116.797 9.52486 116.502 9.81915V14.069C116.502 14.1773 116.481 14.2845 116.44 14.3845C116.398 14.4845 116.337 14.5753 116.261 14.6519C116.184 14.7284 116.093 14.7891 115.993 14.8305C115.893 14.8719 115.786 14.8931 115.678 14.8931H114.847V8.10918H115.773C115.932 8.10914 116.087 8.16315 116.212 8.26242C116.337 8.36168 116.424 8.50033 116.46 8.65577C116.881 8.19328 117.428 7.94098 118.06 7.94098ZM122.854 8.09713C123.024 8.09708 123.19 8.1496 123.329 8.2475C123.468 8.34541 123.574 8.48391 123.631 8.64405L125.133 12.8486L126.635 8.64415C126.692 8.48402 126.798 8.34551 126.937 8.2476C127.076 8.1497 127.242 8.09718 127.412 8.09724H128.598L126.152 14.3567C126.091 14.5112 125.986 14.6439 125.849 14.7374C125.711 14.831 125.549 14.881 125.383 14.8809H124.333L121.668 8.09713H122.854Z' fill='%23373F45'/%3E%3Cpath d='M135.085 14.5514C134.566 14.7616 133.513 15.0416 132.418 15.0416C130.496 15.0416 129.024 13.9345 129.024 11.4396C129.024 9.19701 130.451 7.99792 132.191 7.99792C134.338 7.99792 135.254 9.4378 135.158 11.3979C135.139 11.8029 134.786 12.0983 134.38 12.0983H130.679C130.763 13.1916 131.562 13.7662 132.615 13.7662C133.028 13.7662 133.462 13.7452 133.983 13.6481C134.535 13.545 135.085 13.9375 135.085 14.4985V14.5514ZM133.673 10.949C133.785 9.87621 133.061 9.28752 132.191 9.28752C131.321 9.28752 130.734 9.93979 130.679 10.9489L133.673 10.949Z' fill='%23373F45'/%3E%3Cpath d='M137.345 8.11122C137.497 8.11118 137.645 8.16229 137.765 8.25635C137.884 8.35041 137.969 8.48197 138.005 8.62993C138.566 8.20932 139.268 7.94303 139.759 7.94303C139.801 7.94303 140.068 7.94303 140.489 7.99913V8.7265C140.489 9.11748 140.15 9.4147 139.759 9.4147C139.31 9.4147 138.651 9.5829 138.131 9.8773V14.8951H136.462V8.11112L137.345 8.11122ZM156.6 14.0508V8.09104H155.769C155.314 8.09104 154.944 8.45999 154.944 8.9151V14.8748H155.775C156.23 14.8748 156.6 14.5058 156.6 14.0508ZM158.857 12.9447V9.34254H157.749V8.91912C157.749 8.46401 158.118 8.09506 158.574 8.09506H158.857V6.56739L160.499 6.10479V8.09506H161.986V8.51848C161.986 8.97359 161.617 9.34254 161.161 9.34254H160.499V12.7345C160.499 13.2566 160.795 13.44 161.177 13.503C161.626 13.5774 162 13.9024 162 14.3574V14.977C160.446 14.977 158.857 14.9086 158.857 12.9447ZM98.1929 10.1124C98.2033 6.94046 100.598 5.16809 102.895 5.16809C104.171 5.16809 105.342 5.44285 106.304 6.12953L105.914 6.6631C105.654 7.02011 105.16 7.16194 104.749 6.99949C104.169 6.7702 103.622 6.7218 103.215 6.7218C101.335 6.7218 99.9169 7.92849 99.9068 10.1123C99.9169 12.2959 101.335 13.5201 103.215 13.5201C103.622 13.5201 104.169 13.4717 104.749 13.2424C105.16 13.0799 105.654 13.2046 105.914 13.5615L106.304 14.0952C105.342 14.7819 104.171 15.0566 102.895 15.0566C100.598 15.0566 98.2033 13.2842 98.1929 10.1124ZM147.619 5.21768C148.074 5.21768 148.444 5.58663 148.444 6.04174V9.81968L151.82 5.58131C151.897 5.47733 151.997 5.39282 152.112 5.3346C152.227 5.27638 152.355 5.24607 152.484 5.24611H153.984L150.166 10.0615L153.984 14.8749H152.484C152.355 14.8749 152.227 14.8446 152.112 14.7864C151.997 14.7281 151.897 14.6436 151.82 14.5397L148.444 10.3025V14.0508C148.444 14.5059 148.074 14.8749 147.619 14.8749H146.746V5.21768H147.619Z' fill='%23373F45'/%3E%3Cpath d='M0.773438 6.5752H2.68066C3.56543 6.5752 4.2041 6.7041 4.59668 6.96191C4.99219 7.21973 5.18994 7.62695 5.18994 8.18359C5.18994 8.55859 5.09326 8.87061 4.8999 9.11963C4.70654 9.36865 4.42822 9.52539 4.06494 9.58984V9.63379C4.51611 9.71875 4.84717 9.88721 5.05811 10.1392C5.27197 10.3882 5.37891 10.7266 5.37891 11.1543C5.37891 11.7314 5.17676 12.1841 4.77246 12.5122C4.37109 12.8374 3.81152 13 3.09375 13H0.773438V6.5752ZM1.82373 9.22949H2.83447C3.27393 9.22949 3.59473 9.16064 3.79688 9.02295C3.99902 8.88232 4.1001 8.64502 4.1001 8.31104C4.1001 8.00928 3.99023 7.79102 3.77051 7.65625C3.55371 7.52148 3.20801 7.4541 2.7334 7.4541H1.82373V9.22949ZM1.82373 10.082V12.1167H2.93994C3.37939 12.1167 3.71045 12.0332 3.93311 11.8662C4.15869 11.6963 4.27148 11.4297 4.27148 11.0664C4.27148 10.7324 4.15723 10.4849 3.92871 10.3237C3.7002 10.1626 3.35303 10.082 2.88721 10.082H1.82373Z' fill='%23373F45'/%3E%3Cpath d='M13.011 6.5752V10.7324C13.011 11.207 12.9084 11.623 12.7034 11.9805C12.5012 12.335 12.2068 12.6089 11.8201 12.8022C11.4363 12.9927 10.9763 13.0879 10.4402 13.0879C9.6433 13.0879 9.02368 12.877 8.5813 12.4551C8.13892 12.0332 7.91772 11.4531 7.91772 10.7148V6.5752H8.9724V10.6401C8.9724 11.1704 9.09546 11.5615 9.34155 11.8135C9.58765 12.0654 9.96557 12.1914 10.4753 12.1914C11.4656 12.1914 11.9607 11.6714 11.9607 10.6313V6.5752H13.011Z' fill='%23373F45'/%3E%3Cpath d='M15.9146 13V6.5752H16.9649V13H15.9146Z' fill='%23373F45'/%3E%3Cpath d='M19.9255 13V6.5752H20.9758V12.0991H23.696V13H19.9255Z' fill='%23373F45'/%3E%3Cpath d='M28.2828 13H27.2325V7.47607H25.3428V6.5752H30.1724V7.47607H28.2828V13Z' fill='%23373F45'/%3E%3Cpath d='M41.9472 13H40.8046L39.7148 9.16796C39.6679 9.00097 39.6093 8.76074 39.539 8.44727C39.4687 8.13086 39.4262 7.91113 39.4116 7.78809C39.3823 7.97559 39.3339 8.21875 39.2665 8.51758C39.2021 8.81641 39.1479 9.03905 39.1039 9.18554L38.0405 13H36.8979L36.0673 9.7832L35.2236 6.5752H36.2958L37.2143 10.3193C37.3578 10.9199 37.4604 11.4502 37.5219 11.9102C37.5541 11.6611 37.6025 11.3828 37.6669 11.0752C37.7314 10.7676 37.79 10.5186 37.8427 10.3281L38.8886 6.5752H39.9301L41.0024 10.3457C41.1049 10.6943 41.2133 11.2158 41.3276 11.9102C41.3715 11.4912 41.477 10.958 41.644 10.3105L42.558 6.5752H43.6215L41.9472 13Z' fill='%23373F45'/%3E%3Cpath d='M45.7957 13V6.5752H46.846V13H45.7957Z' fill='%23373F45'/%3E%3Cpath d='M52.0258 13H50.9755V7.47607H49.0859V6.5752H53.9155V7.47607H52.0258V13Z' fill='%23373F45'/%3E%3Cpath d='M61.2312 13H60.1765V10.104H57.2146V13H56.1643V6.5752H57.2146V9.20312H60.1765V6.5752H61.2312V13Z' fill='%23373F45'/%3E%3C/svg%3E");}.formkit-form[data-uid="047dcecf6b"] .formkit-powered-by-convertkit:hover,.formkit-form[data-uid="047dcecf6b"] .formkit-powered-by-convertkit:focus{background-color:#ffffff;-webkit-transform:scale(1.025) perspective(1px);-ms-transform:scale(1.025) perspective(1px);transform:scale(1.025) perspective(1px);opacity:1;}.formkit-form[data-uid="047dcecf6b"] .formkit-powered-by-convertkit[data-variant="dark"],.formkit-form[data-uid="047dcecf6b"] .formkit-powered-by-convertkit[data-variant="light"]{background-color:transparent;border-color:transparent;width:166px;}.formkit-form[data-uid="047dcecf6b"] .formkit-powered-by-convertkit[data-variant="light"]{color:#ffffff;background-image:url("data:image/svg+xml;charset=utf8,%3Csvg width='162' height='20' viewBox='0 0 162 20' fill='none' xmlns='http://www.w3.org/2000/svg'%3E%3Cpath d='M83.0561 15.2457C86.675 15.2457 89.4722 12.5154 89.4722 9.14749C89.4722 5.99211 86.8443 4.06563 85.1038 4.06563C82.6801 4.06563 80.7373 5.76407 80.4605 8.28551C80.4092 8.75244 80.0387 9.14403 79.5686 9.14069C78.7871 9.13509 77.6507 9.12841 76.9314 9.13092C76.6217 9.13199 76.3658 8.88106 76.381 8.57196C76.4895 6.38513 77.2218 4.3404 78.618 2.76974C80.1695 1.02445 82.4289 0 85.1038 0C89.5979 0 93.8406 4.07791 93.8406 9.14749C93.8406 14.7608 89.1832 19.3113 83.1517 19.3113C78.8502 19.3113 74.5179 16.5041 73.0053 12.5795C72.9999 12.565 72.9986 12.5492 73.0015 12.534C73.0218 12.4179 73.0617 12.3118 73.1011 12.2074C73.1583 12.0555 73.2143 11.907 73.2062 11.7359L73.18 11.1892C73.174 11.0569 73.2075 10.9258 73.2764 10.8127C73.3452 10.6995 73.4463 10.6094 73.5666 10.554L73.7852 10.4523C73.9077 10.3957 74.0148 10.3105 74.0976 10.204C74.1803 10.0974 74.2363 9.97252 74.2608 9.83983C74.3341 9.43894 74.6865 9.14749 75.0979 9.14749C75.7404 9.14749 76.299 9.57412 76.5088 10.1806C77.5188 13.1 79.1245 15.2457 83.0561 15.2457Z' fill='white'/%3E%3Cpath d='M155.758 6.91365C155.028 6.91365 154.804 6.47916 154.804 5.98857C154.804 5.46997 154.986 5.06348 155.758 5.06348C156.53 5.06348 156.712 5.46997 156.712 5.98857C156.712 6.47905 156.516 6.91365 155.758 6.91365ZM142.441 12.9304V9.32833L141.415 9.32323V8.90392C141.415 8.44719 141.786 8.07758 142.244 8.07986L142.441 8.08095V6.55306L144.082 6.09057V8.08073H145.569V8.50416C145.569 8.61242 145.548 8.71961 145.506 8.81961C145.465 8.91961 145.404 9.01047 145.328 9.08699C145.251 9.16351 145.16 9.2242 145.06 9.26559C144.96 9.30698 144.853 9.32826 144.745 9.32822H144.082V12.7201C144.082 13.2423 144.378 13.4256 144.76 13.4887C145.209 13.5629 145.583 13.888 145.583 14.343V14.9626C144.029 14.9626 142.441 14.8942 142.441 12.9304Z' fill='white'/%3E%3Cpath d='M110.058 7.92554C108.417 7.88344 106.396 8.92062 106.396 11.5137C106.396 14.0646 108.417 15.0738 110.058 15.0318C111.742 15.0738 113.748 14.0646 113.748 11.5137C113.748 8.92062 111.742 7.88344 110.058 7.92554ZM110.07 13.7586C108.878 13.7586 108.032 12.8905 108.032 11.461C108.032 10.1013 108.878 9.20569 110.071 9.20569C111.263 9.20569 112.101 10.0995 112.101 11.459C112.101 12.8887 111.263 13.7586 110.07 13.7586Z' fill='white'/%3E%3Cpath d='M118.06 7.94098C119.491 7.94098 120.978 8.33337 120.978 11.1366V14.893H120.063C119.608 14.893 119.238 14.524 119.238 14.0689V10.9965C119.238 9.66506 118.747 9.16047 117.891 9.16047C117.414 9.16047 116.797 9.52486 116.502 9.81915V14.069C116.502 14.1773 116.481 14.2845 116.44 14.3845C116.398 14.4845 116.337 14.5753 116.261 14.6519C116.184 14.7284 116.093 14.7891 115.993 14.8305C115.893 14.8719 115.786 14.8931 115.678 14.8931H114.847V8.10918H115.773C115.932 8.10914 116.087 8.16315 116.212 8.26242C116.337 8.36168 116.424 8.50033 116.46 8.65577C116.881 8.19328 117.428 7.94098 118.06 7.94098ZM122.854 8.09713C123.024 8.09708 123.19 8.1496 123.329 8.2475C123.468 8.34541 123.574 8.48391 123.631 8.64405L125.133 12.8486L126.635 8.64415C126.692 8.48402 126.798 8.34551 126.937 8.2476C127.076 8.1497 127.242 8.09718 127.412 8.09724H128.598L126.152 14.3567C126.091 14.5112 125.986 14.6439 125.849 14.7374C125.711 14.831 125.549 14.881 125.383 14.8809H124.333L121.668 8.09713H122.854Z' fill='white'/%3E%3Cpath d='M135.085 14.5514C134.566 14.7616 133.513 15.0416 132.418 15.0416C130.496 15.0416 129.024 13.9345 129.024 11.4396C129.024 9.19701 130.451 7.99792 132.191 7.99792C134.338 7.99792 135.254 9.4378 135.158 11.3979C135.139 11.8029 134.786 12.0983 134.38 12.0983H130.679C130.763 13.1916 131.562 13.7662 132.615 13.7662C133.028 13.7662 133.462 13.7452 133.983 13.6481C134.535 13.545 135.085 13.9375 135.085 14.4985V14.5514ZM133.673 10.949C133.785 9.87621 133.061 9.28752 132.191 9.28752C131.321 9.28752 130.734 9.93979 130.679 10.9489L133.673 10.949Z' fill='white'/%3E%3Cpath d='M137.345 8.11122C137.497 8.11118 137.645 8.16229 137.765 8.25635C137.884 8.35041 137.969 8.48197 138.005 8.62993C138.566 8.20932 139.268 7.94303 139.759 7.94303C139.801 7.94303 140.068 7.94303 140.489 7.99913V8.7265C140.489 9.11748 140.15 9.4147 139.759 9.4147C139.31 9.4147 138.651 9.5829 138.131 9.8773V14.8951H136.462V8.11112L137.345 8.11122ZM156.6 14.0508V8.09104H155.769C155.314 8.09104 154.944 8.45999 154.944 8.9151V14.8748H155.775C156.23 14.8748 156.6 14.5058 156.6 14.0508ZM158.857 12.9447V9.34254H157.749V8.91912C157.749 8.46401 158.118 8.09506 158.574 8.09506H158.857V6.56739L160.499 6.10479V8.09506H161.986V8.51848C161.986 8.97359 161.617 9.34254 161.161 9.34254H160.499V12.7345C160.499 13.2566 160.795 13.44 161.177 13.503C161.626 13.5774 162 13.9024 162 14.3574V14.977C160.446 14.977 158.857 14.9086 158.857 12.9447ZM98.1929 10.1124C98.2033 6.94046 100.598 5.16809 102.895 5.16809C104.171 5.16809 105.342 5.44285 106.304 6.12953L105.914 6.6631C105.654 7.02011 105.16 7.16194 104.749 6.99949C104.169 6.7702 103.622 6.7218 103.215 6.7218C101.335 6.7218 99.9169 7.92849 99.9068 10.1123C99.9169 12.2959 101.335 13.5201 103.215 13.5201C103.622 13.5201 104.169 13.4717 104.749 13.2424C105.16 13.0799 105.654 13.2046 105.914 13.5615L106.304 14.0952C105.342 14.7819 104.171 15.0566 102.895 15.0566C100.598 15.0566 98.2033 13.2842 98.1929 10.1124ZM147.619 5.21768C148.074 5.21768 148.444 5.58663 148.444 6.04174V9.81968L151.82 5.58131C151.897 5.47733 151.997 5.39282 152.112 5.3346C152.227 5.27638 152.355 5.24607 152.484 5.24611H153.984L150.166 10.0615L153.984 14.8749H152.484C152.355 14.8749 152.227 14.8446 152.112 14.7864C151.997 14.7281 151.897 14.6436 151.82 14.5397L148.444 10.3025V14.0508C148.444 14.5059 148.074 14.8749 147.619 14.8749H146.746V5.21768H147.619Z' fill='white'/%3E%3Cpath d='M0.773438 6.5752H2.68066C3.56543 6.5752 4.2041 6.7041 4.59668 6.96191C4.99219 7.21973 5.18994 7.62695 5.18994 8.18359C5.18994 8.55859 5.09326 8.87061 4.8999 9.11963C4.70654 9.36865 4.42822 9.52539 4.06494 9.58984V9.63379C4.51611 9.71875 4.84717 9.88721 5.05811 10.1392C5.27197 10.3882 5.37891 10.7266 5.37891 11.1543C5.37891 11.7314 5.17676 12.1841 4.77246 12.5122C4.37109 12.8374 3.81152 13 3.09375 13H0.773438V6.5752ZM1.82373 9.22949H2.83447C3.27393 9.22949 3.59473 9.16064 3.79688 9.02295C3.99902 8.88232 4.1001 8.64502 4.1001 8.31104C4.1001 8.00928 3.99023 7.79102 3.77051 7.65625C3.55371 7.52148 3.20801 7.4541 2.7334 7.4541H1.82373V9.22949ZM1.82373 10.082V12.1167H2.93994C3.37939 12.1167 3.71045 12.0332 3.93311 11.8662C4.15869 11.6963 4.27148 11.4297 4.27148 11.0664C4.27148 10.7324 4.15723 10.4849 3.92871 10.3237C3.7002 10.1626 3.35303 10.082 2.88721 10.082H1.82373Z' fill='white'/%3E%3Cpath d='M13.011 6.5752V10.7324C13.011 11.207 12.9084 11.623 12.7034 11.9805C12.5012 12.335 12.2068 12.6089 11.8201 12.8022C11.4363 12.9927 10.9763 13.0879 10.4402 13.0879C9.6433 13.0879 9.02368 12.877 8.5813 12.4551C8.13892 12.0332 7.91772 11.4531 7.91772 10.7148V6.5752H8.9724V10.6401C8.9724 11.1704 9.09546 11.5615 9.34155 11.8135C9.58765 12.0654 9.96557 12.1914 10.4753 12.1914C11.4656 12.1914 11.9607 11.6714 11.9607 10.6313V6.5752H13.011Z' fill='white'/%3E%3Cpath d='M15.9146 13V6.5752H16.9649V13H15.9146Z' fill='white'/%3E%3Cpath d='M19.9255 13V6.5752H20.9758V12.0991H23.696V13H19.9255Z' fill='white'/%3E%3Cpath d='M28.2828 13H27.2325V7.47607H25.3428V6.5752H30.1724V7.47607H28.2828V13Z' fill='white'/%3E%3Cpath d='M41.9472 13H40.8046L39.7148 9.16796C39.6679 9.00097 39.6093 8.76074 39.539 8.44727C39.4687 8.13086 39.4262 7.91113 39.4116 7.78809C39.3823 7.97559 39.3339 8.21875 39.2665 8.51758C39.2021 8.81641 39.1479 9.03905 39.1039 9.18554L38.0405 13H36.8979L36.0673 9.7832L35.2236 6.5752H36.2958L37.2143 10.3193C37.3578 10.9199 37.4604 11.4502 37.5219 11.9102C37.5541 11.6611 37.6025 11.3828 37.6669 11.0752C37.7314 10.7676 37.79 10.5186 37.8427 10.3281L38.8886 6.5752H39.9301L41.0024 10.3457C41.1049 10.6943 41.2133 11.2158 41.3276 11.9102C41.3715 11.4912 41.477 10.958 41.644 10.3105L42.558 6.5752H43.6215L41.9472 13Z' fill='white'/%3E%3Cpath d='M45.7957 13V6.5752H46.846V13H45.7957Z' fill='white'/%3E%3Cpath d='M52.0258 13H50.9755V7.47607H49.0859V6.5752H53.9155V7.47607H52.0258V13Z' fill='white'/%3E%3Cpath d='M61.2312 13H60.1765V10.104H57.2146V13H56.1643V6.5752H57.2146V9.20312H60.1765V6.5752H61.2312V13Z' fill='white'/%3E%3C/svg%3E");}@-webkit-keyframes formkit-bouncedelay-formkit-form-data-uid-047dcecf6b-{0%,80%,100%{-webkit-transform:scale(0);-ms-transform:scale(0);transform:scale(0);}40%{-webkit-transform:scale(1);-ms-transform:scale(1);transform:scale(1);}}@keyframes formkit-bouncedelay-formkit-form-data-uid-047dcecf6b-{0%,80%,100%{-webkit-transform:scale(0);-ms-transform:scale(0);transform:scale(0);}40%{-webkit-transform:scale(1);-ms-transform:scale(1);transform:scale(1);}}.formkit-form[data-uid="047dcecf6b"] blockquote{padding:10px 20px;margin:0 0 20px;border-left:5px solid #e1e1e1;}.formkit-form[data-uid="047dcecf6b"] .seva-custom-content{padding:15px;font-size:16px;color:#fff;mix-blend-mode:difference;}.formkit-form[data-uid="047dcecf6b"] .formkit-modal.guard{max-width:420px;width:100%;} .formkit-form[data-uid="047dcecf6b"]{max-width:700px;}.formkit-form[data-uid="047dcecf6b"] [data-style="clean"]{width:100%;}.formkit-form[data-uid="047dcecf6b"] .formkit-fields{display:-webkit-box;display:-webkit-flex;display:-ms-flexbox;display:flex;-webkit-flex-wrap:wrap;-ms-flex-wrap:wrap;flex-wrap:wrap;margin:0 auto;}.formkit-form[data-uid="047dcecf6b"] .formkit-field,.formkit-form[data-uid="047dcecf6b"] .formkit-submit{margin:0 0 15px 0;-webkit-flex:1 0 100%;-ms-flex:1 0 100%;flex:1 0 100%;}.formkit-form[data-uid="047dcecf6b"] .formkit-powered-by-convertkit-container{margin:0;}.formkit-form[data-uid="047dcecf6b"] .formkit-submit{position:static;}.formkit-form[data-uid="047dcecf6b"][min-width~="700"] [data-style="clean"],.formkit-form[data-uid="047dcecf6b"][min-width~="800"] [data-style="clean"]{padding:10px;}.formkit-form[data-uid="047dcecf6b"][min-width~="700"] .formkit-fields[data-stacked="false"],.formkit-form[data-uid="047dcecf6b"][min-width~="800"] .formkit-fields[data-stacked="false"]{margin-left:-5px;margin-right:-5px;}.formkit-form[data-uid="047dcecf6b"][min-width~="700"] .formkit-fields[data-stacked="false"] .formkit-field,.formkit-form[data-uid="047dcecf6b"][min-width~="800"] .formkit-fields[data-stacked="false"] .formkit-field,.formkit-form[data-uid="047dcecf6b"][min-width~="700"] .formkit-fields[data-stacked="false"] .formkit-submit,.formkit-form[data-uid="047dcecf6b"][min-width~="800"] .formkit-fields[data-stacked="false"] .formkit-submit{margin:0 5px 15px 5px;}.formkit-form[data-uid="047dcecf6b"][min-width~="700"] .formkit-fields[data-stacked="false"] .formkit-field,.formkit-form[data-uid="047dcecf6b"][min-width~="800"] .formkit-fields[data-stacked="false"] .formkit-field{-webkit-flex:100 1 auto;-ms-flex:100 1 auto;flex:100 1 auto;}.formkit-form[data-uid="047dcecf6b"][min-width~="700"] .formkit-fields[data-stacked="false"] .formkit-submit,.formkit-form[data-uid="047dcecf6b"][min-width~="800"] .formkit-fields[data-stacked="false"] .formkit-submit{-webkit-flex:1 1 auto;-ms-flex:1 1 auto;flex:1 1 auto;}
Sharing is Caring
Pin for Later



I just like the valuable information you provide to your articles. I’ll bookmark your weblog and take a look at once
more here frequently. I’m reasonably certain I will be told many new stuff right right here! Best of luck for the following.